TaurusForm User’s Interface
The TaurusForm widget is the standard way for Taurus applications to
present a set of attribute and device readings and controls widgets with a form-
like layout.
For each item (attribute or device) represented in a TaurusForm, the following elements will be shown (vertically aligned with those of the other items along 5 columns):
label text. It shows the name or other identification of the item.
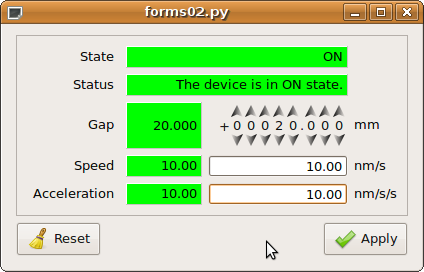
read widget. It shows the current value of the item. If the information cannot be shown in a compact way, it may be a button that launches a separate dialog which provides detailed information. The read widget may provide information on both the read value and the quality status of the attribute, typically using the Taurus color convention. The read widget will extend over the second and third columns for those items that are not writable.
write widget (only shown if the item allows writting). A widget for modifying the value of the item. If it cannot be done in a compact way, it may be a button that launches a separate dialog which provides detailed information.
units text. It shows the units associated to the item (it is not shown if no units are defined for this item).
extra widget. An extra space that may be used by some custom widgets (only shown if used).
The precise widgets that are used by default for each item are determined by the type of attribute / class of device as well as by a custom mapping that is set at Taurus installation time.
TaurusForm as a stand-alone application
You may also use TaurusForm as a stand-alone application for controlling some attributes or devices from the control system. You can launch the stand-alone TaurusForm with the following command:
taurus form [options] [<model_list>]
Run the following command for more details:
taurus form --help
The model list is optional and is a space-separated list of models for TaurusForm.
The widgets used for different types of models
By default, TaurusForm tries to use the most appropriate Taurus widget for representing its models.
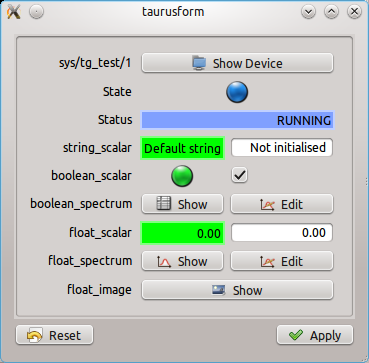
A Taurus form created with the following command taurus form sys/tg_test/1 sys/tg_test/1/state sys/tg_test/1/status sys/tg_test/1/string_scalar sys/tg_test/1/boolean_scalar sys/tg_test/1/boolean_spectrum sys/tg_test/1/float_scalar sys/tg_test/1/float_spectrum sys/tg_test/1/float_image
TaurusForm uses “item factories” to obtain the widget with which each model is represented. These item factories can be provided by taurus itself or by external plugins (e.g. sardana provides a factory to display its pool devices). The available factories can be listed, enabled and excluded using CLI arguments (see taurus form –help). If a given model is not handled by any enabled item factory, a default generic widget will be used which introspects the model (e.g., if it is an attribute, it checks whether it is a scalar or an array, whether it is a number or a string or a boolean, whether it is writable or read-only, etc.) and uses adequate subwidgets to display it. In certain cases this generic widget may be further customized by the user (e.g. by swithing among a set of possible subwidgets). See the Changing the contents of a form section).
Changing the contents of a form
If the application using the form allows it, you can modify both what is shown and how it is shown in the form.
You can alter what is shown in two ways:
right-clicking in the form and selecting the Modify contents option in the context menu. A TaurusModelChooser widget will let you modify the list of taurus models being represented by the form.
Dropping models that you drag from another taurus widget (typically another TaurusForm, or a TaurusModelChooser). See the Drag and Drop support section for more details.
Regarding how it is shown, you can change the following (provided that user modifications are allowed for this form):
which widget is used for displaying the read value or the write value of a given item. This is done by right-clicking on the label of the item and selecting the change Read Widget (or change write widget) option.
Whether to use compact mode or not. See Compact mode section for more details
The text shown in the label widget for a value can be customised via the ‘Change Label’ option in the label’s context menu. It can also be changed for all values in a form with the ‘Change Labels’ option of the form’s context menu.
Tip
You can use the Modify contents option to re-order what is shown.
Drag and Drop support
TaurusForm supports drag&drop of models for its items. Essentially each item
represented in a form is associated to a Taurus model. By
dragging the label of a given item in a form, what happens behind the scenes is
that the model is copied. Many Taurus widgets can be instructed to accept drops
of models (e.g. TaurusPlot, TaurusTrend,
TaurusForm,…) and alter their models according to the new model
passed.
When a TaurusForm receives one or more models from a drop, it appends them to its current list of displayed models and shows them.
Tip
If you accidentally dropped a model and want to remove the new item, just use the Modify contents option from the form’s context menu.
Compact Mode
When in compact mode, a value in a form is shown with only one column for both the read and write widget. Normally the read widget is shown, and only when the user triggers the edition mode, the write widget is shown. The edit triggers are, tipically:
the F2 key
Double-clicking on the read widget
The edition mode is left when the write widget loses focus, or the changes have been applied. Also, in many cases, when the “ESC” key is pressed.
You can enable/disable the compact mode for a value by right-clicking on its label and selecting ‘compact mode’. You can also set the compact mode for all values in the form via the context menu of the form.
Writing to attributes
Taurus attributes can be read-only or allow writing. Those attributes that are writable have two values: the read value and the write value. The read value is displayed by the read widget in the second column of the TaurusForm (just right of the label). The write widget, in the third column of the TaurusForm allows you to modify the write value.
Note that the read value and the write value of an attribute are not necessarily equal. The write value is a “set point”, or “desired value” while the read value gives the actual value as read by the control system (for example, in a power supply device, the read value of its voltage attribute oscillate around the write value due to ripple). Also note that the units associated to the read and write values may not be the same (In Tango, they are internally the same, but other schemes may have ways of defining them independently)
Since writing wrong values may be dangerous for some equipment, the default behaviour of write widgets is not to apply new values directly as you type the value or move a dial. Instead, the corresponding label of the item becomes highlighted with a blue frame, indicating that the write value has been changed (we say that the item has pending operations) and that these changes can be applied. Some write widgets give extra feedback apart from that of the label.
When a widget has pending operations, you can check exactly what is the pending operation by consulting its tooltip.
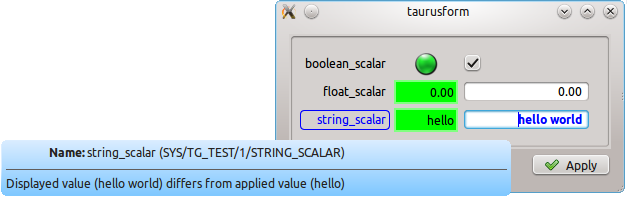
Example of pending operation notification: the write value of the array_scalar attribute has been changed but it is not yet applied. The label for this item shows a blue frame, the write widget shows bold blue text and the tooltip gives extra information.
Pending operations in a form can be applied either individually for each item or all at once:
The way for applying changes for a single item may depend on the write widget involved, but typically (it is the case for all default widgets) it is done by pressing the Enter key on the write widget (see also the Forced apply section).
For applying all pending operations of a whole form at once, you can click on the Apply button of the form (if available).
If the form provides buttons, the Reset button will discard all pending operations.
Forced apply
By default, if a write value has not changed, there will be no pending operations and therefore the value cannot be re-applied. Some times, however, it may be interesting to force another write of the same value (e.g. a certain hardware device needs an extra “push” to reach the desired value). This can be done by pressing CTRL+Enter (instead of just Enter) on the write widget.
External changes of displayed attributes
When the read value of an attribute is updated in the control system, the read widget for that attribute will reflect the new value (depending on the configuration of the control system, a certain refresh period may be waited).
When the write value of an attribute is updated in the control system (a certain attribute may be accessed simultaneously from different client aplications or even from different parts of the same application), the item representing that attribute will be notified, but the value displayed by the write widget will not be changed (instead, the item will show that there is a pending operation). In this way, concurrent editions will not interfere with your own editions, but at the same time you will be aware of them.
Tip
Remember that you can check the cause of a pending operation by consulting the write widget tooltip.