TaurusGUI User’s Interface
TaurusGui is not a GUI in itself but a framework for building Taurus graphical user interfaces in an efficient way (but not all Taurus-based applications are necessarily TaurusGui-based).
A specific TaurusGui-based application is defined in a “configuration directory”
which is read by TaurusGui to construct the specific GUI.
From the user perspective the only important thing is that, while different TaurusGui-based applications may be very different, they all share some features and have a common look-and-feel. This document describes these common features. For documentation on specific aspects of a given TaurusGui-based application, please refer to the documentation of that application.
An example of a Beamline GUI based on TaurusGui
Launching TaurusGUI
Normally you will be launching a specific GUI built on top of TaurusGUI (as opposed to launching TaurusGUI directly), so you should refer to the specific instructions for launching that GUI.
Still, you may want to launch TaurusGui directly for debugging an specific application. For this, use the following command:
taurus gui [options]
For creating a new taurusgui from scratch, use:
taurus newgui
General structure of a TaurusGUI application
TaurusGui-based applications consist in a main window containing a number of panels.
Each panel contains a widget (e.g., a form, a plot, a synoptic…) and is largely independent on the rest of the panels.
You can re-arrange the panels by moving and resizing them in the window, or hide/show them or leave some of them floating as independent dialogs. You can even add new panels to the application “on-the-fly”, selecting them from a catalog of available widgets.
This is because a key feature of TaurusGui applications is that you can adapt them to your needs. But since your needs are not always the same, the TaurusGui- based applications allow you to save the panel arrangement and other user modifiable choices as a perspective. You can then easily switch to different application configurations.
Another characteristic element of Taurus-Gui based applications is the Applets area on the right side of the main window. This area is typically populated with small widgets providing quick access to some relevant information or control. It also contains the the logo of the institute (or some other general logo) and the logo of the application.
Other common components of TaurusGui-based applications (although not necessarily present) are:
Help browser
Re-arranging panels (moving, resizing, hiding,…)
Note
In order to prevent accidental rearranging of panels, the view can be locked, which will disable the drag and drop of panels. You can lock/unlock the view from the View Menu
Panels can be moved around by dragging them from their title bar. When dropping a panel, you can choose whether to push other panels to make room for the new one, or to drop it on top of an existing panel (this will “tabify” the panels) or to leave it floating outside of the main window.
You can also modify the dimensions of a panel without changing its position: just drag the boundaries between panels.
If the view has not been locked, the title bar of each panel contains 2 buttons: one for switching from floating to docked state and another for hiding the panel. Hidden panels are not shown, but are still available in the application. You can show them again by using the View->Panels menu.
Also, some panels may be connected to a synoptic panel and will be shown (if hidden) when selecting a certain element in the synoptic. Refer to the Synoptic Panels section for more details.
Tip
If, for some reason, you changed the panels too much and would like to revert the changes, you can always load a previously saved perspective.
Creating custom panels
Typically, a TaurusGui-based application will come out-of-the-box with one or more pre-defined panels providing the application functionality. But you may want to extend the application by adding custom panels to provide more features (e.g., to add an extra plot panel, or a new form).
You can add a new panel by clicking in the “New Panel” button of the main tool bar (or selecting Panels->New Panel…). This will open a dialog offering a catalog of different panel types and options for your new panel. Once accepted, the new panel will appear floating, ready to be docked to the main window.
Tip
if you are interested in creating a panel different from those offered in the catalog, you can do so by using the “other…” button and manually selecting the module and widget class of your choice.
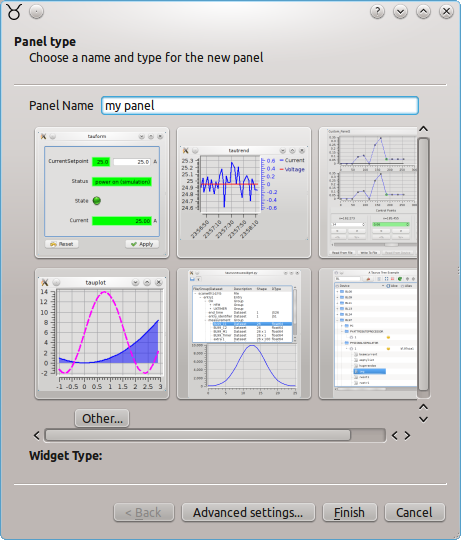
The New Panel dialog
Tip
A common use case is creating a new form panel (empty) and then fill it by dropping elements from other existing forms in order to group together controls that are scattered over several panels
When you close the application (or when you save a perspective), a dialog will be shown if you have created any custom panels. In this dialog you can choose which of the custom panels you want to keep for future use and which are only meant for the current session.
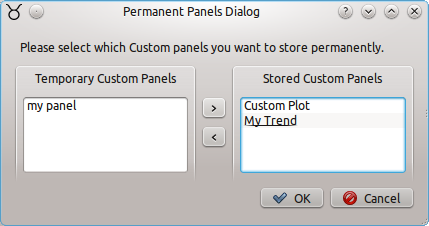
The dialog for selection which custom panels are to be stored permanently
You can also open this dialog from the Panels->Switch temporary/permanent status… option.
Tip
if you want to remove a custom panel from an application, just hide it and use the Switch temporary/permanent status… option for making it “temporary” so that it is not stored for future sessions.
Perspectives
Different tasks often require different application layouts and different control widgets to be at hand (e.g., casual use VS expert use, or equipment calibration VS equipment operation). TaurusGui-based applications typically provide a set of pre-defined perspectives which are just configurations that can be loaded at any moment to set a given panel arrangement suited for a given task.
All TaurusGui based applications provide a Perspectives Toolbar (if it is not shown, you can enable it from View->Toolbars, or you can access its functionalities from the View menu).

The perspectives toolbar. The button on the left is a drop-down that shows all available perspectives. The button on the right allows you to save the current arrangement as a perspective.
Switching to another perspective can be done using the Load perspectives drop-down button in the perspectives toolbar (or using the View->Load perspective option).
Apart from the pre-defined perspectives, you can always re-arrange panels and store your preferred arrangement as a perspective using the Save perspective button in the perspectives toolbar (or using the View->Save perspective option).
Tip
If you want to backup your current perspectives, or you want to use some perspectives you created in one computer in another computer (or another user of the same computer) you can do so by using the File->Export Settings … option. Similarly, use the File->Import Settings … option to update the application perspectives with those contained in the imported file.
Synoptic panels
A special type of panel present in some TaurusGui-based applications is the Synoptics. Synoptics panels are typically used for providing a visual representation of the hardware that is controlled by the GUI. Some elements or areas of the synoptic panel may be active, meaning that they can be selected with the mouse.
A default feature of the TaurusGUI framework is that active elements of synoptic panels whose name matches that of an existing panel of the application will cause that panel to be shown (and conversely, if the panel is selected, the element in the synoptic will be highlighted). This is very useful because synoptic panels can be used as a sort of quick index or browser to navigate in panel-crowded applications.
To add a Synoptic panel to a taurusgui after the creation of the taurusgui, use the “Add Panel” button (or menu), select the “TaurusJDrawSynopticsView”, enter “Advanced settings…” to enter the full path of the JDraw file into the “Model” field.
Also note that you can find a button in the application toolbar for showing/hiding each synoptic panel.
External Application Launchers
TaurusGui-based applications allow you to add and remove launchers for “external applications”. An external application is some other program already installed in the system which will be launched as an independent process (i.e., the TaurusGui just provides a convenience launcher for some related but independent program).
External application launchers may be pre-defined in the application and new ones can be added and removed at any moment by using the corresponding option of the Tools->External Applications menu.
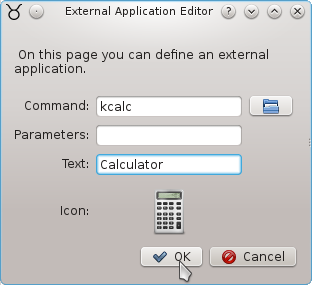
External application editor. You can associate a command, a text and an icon to a new launcher
Just as with the custom panels, when you close the application (or when you save a perspective), a dialog will be shown if you have created any custom launchers. In this dialog you can choose which of the custom launchers you want to keep for future use and which are only meant for the current session.
Tip
You may find external application launchers useful for launching some arbitrary python script that automates some task related to the purpose of the GUI.
Sardana integration (Macroserver & Pool)
Macro execution panels
Many TaurusGui-based applications are used to interact with a Sardana Pool and MacroServer in order to run macros (e.g. scans). In these cases several macro- related panels will be available:
Macros, a macro executor widget. See this for further information.
Sequences, a macro sequencer widget. See this for further information.
MacroDescription, a text panel which provides documentation on the selected macro.
DoorOutput, a text panel that logs the output of macro executions (similar to what you would see if launching the macro in a spock console)
DoorDebug, a text panel that logs the debug messages of macro executions.
DoorResult, a text panel that logs the return value of the macro executions.
Experiment Config, an experiment configuration <expconf_ui> widget for configuring acquisition and display parameters
Sardana Editor, a Sardana-aware code editor <sardanaeditor_ui> for creating/modifying Sardana macros.
Also, some other temporary panels may be dynamically created depending on the experiment configuration:
1D Scans, a trend that plots the values of scalar attributes during some scan macro executions.
Note
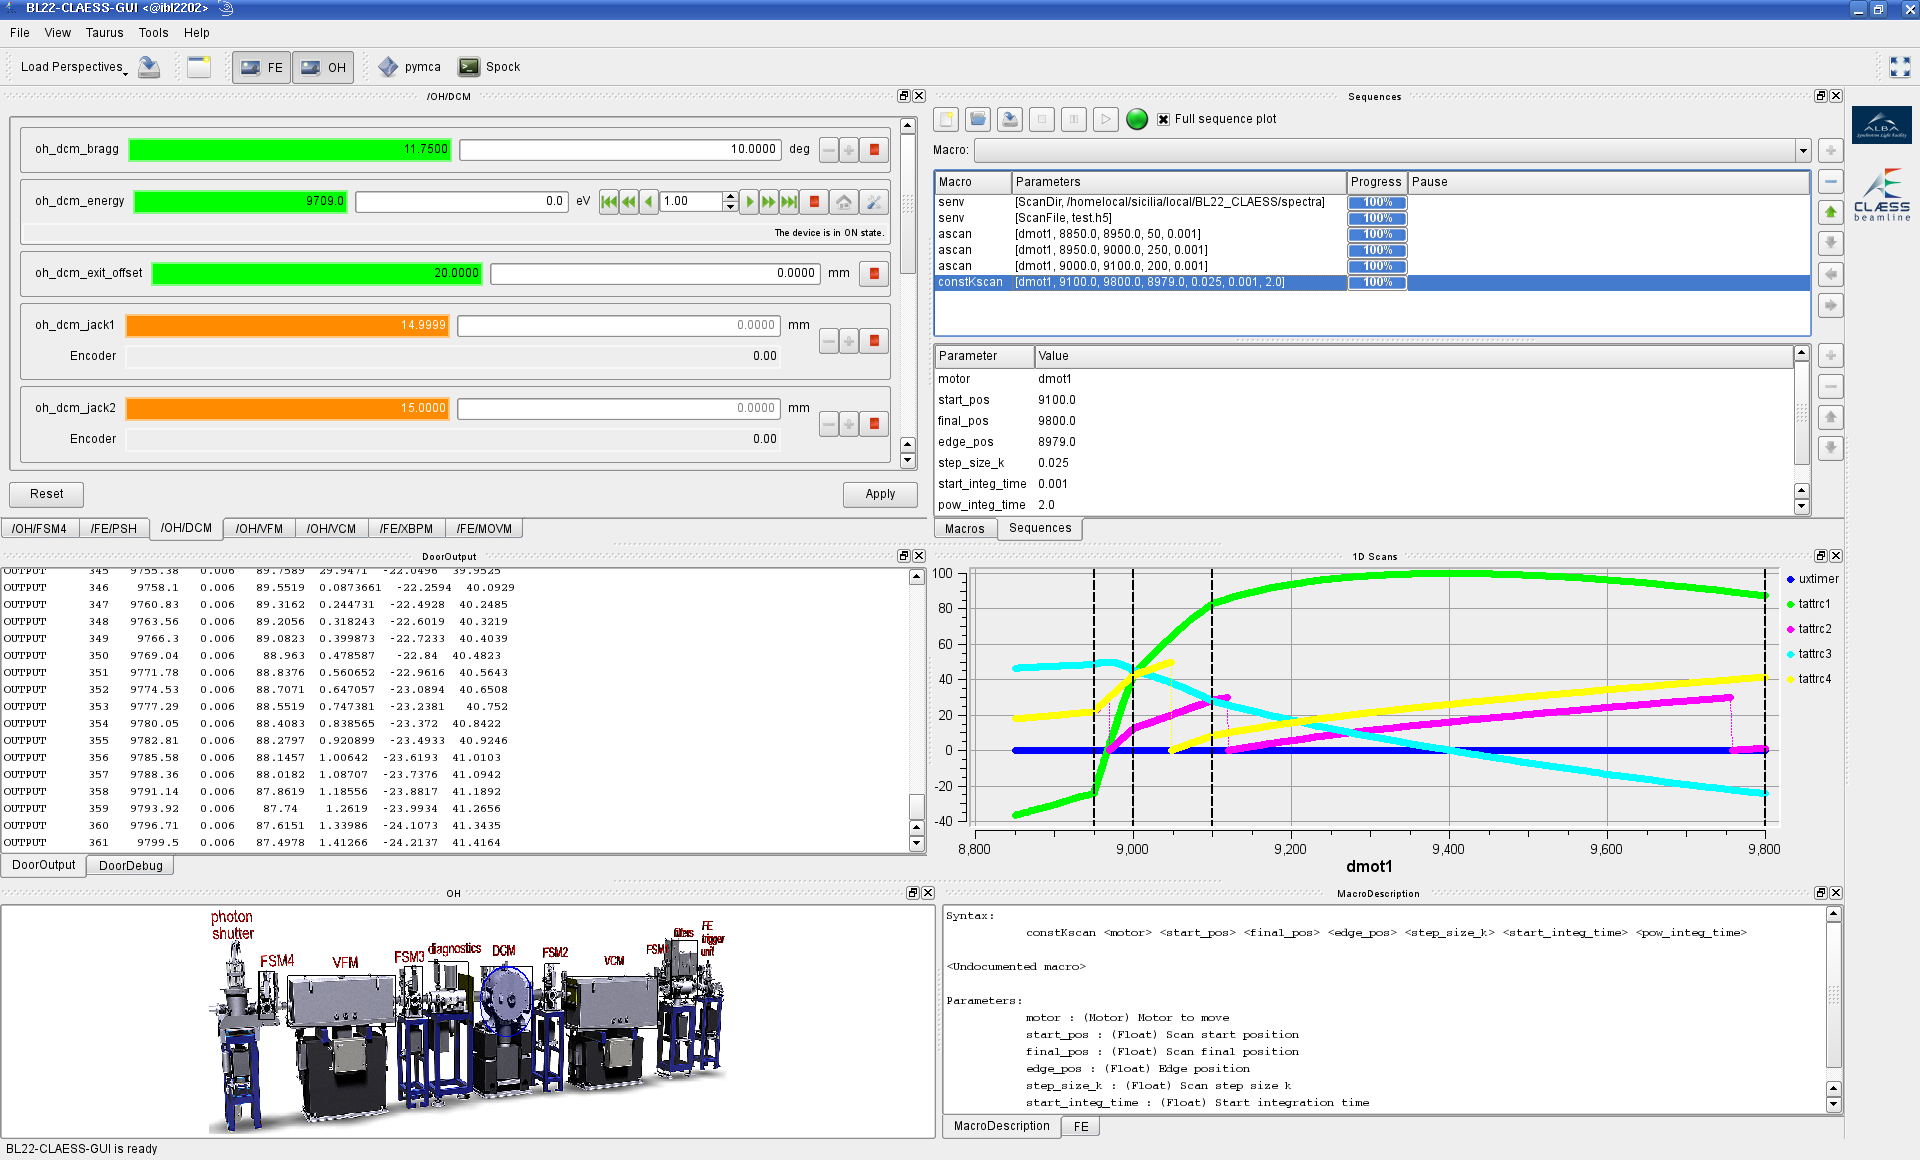
You can run taurus gui macrogui for seeing an example of a TaurusGUI- based application that provides the aforementioned panels
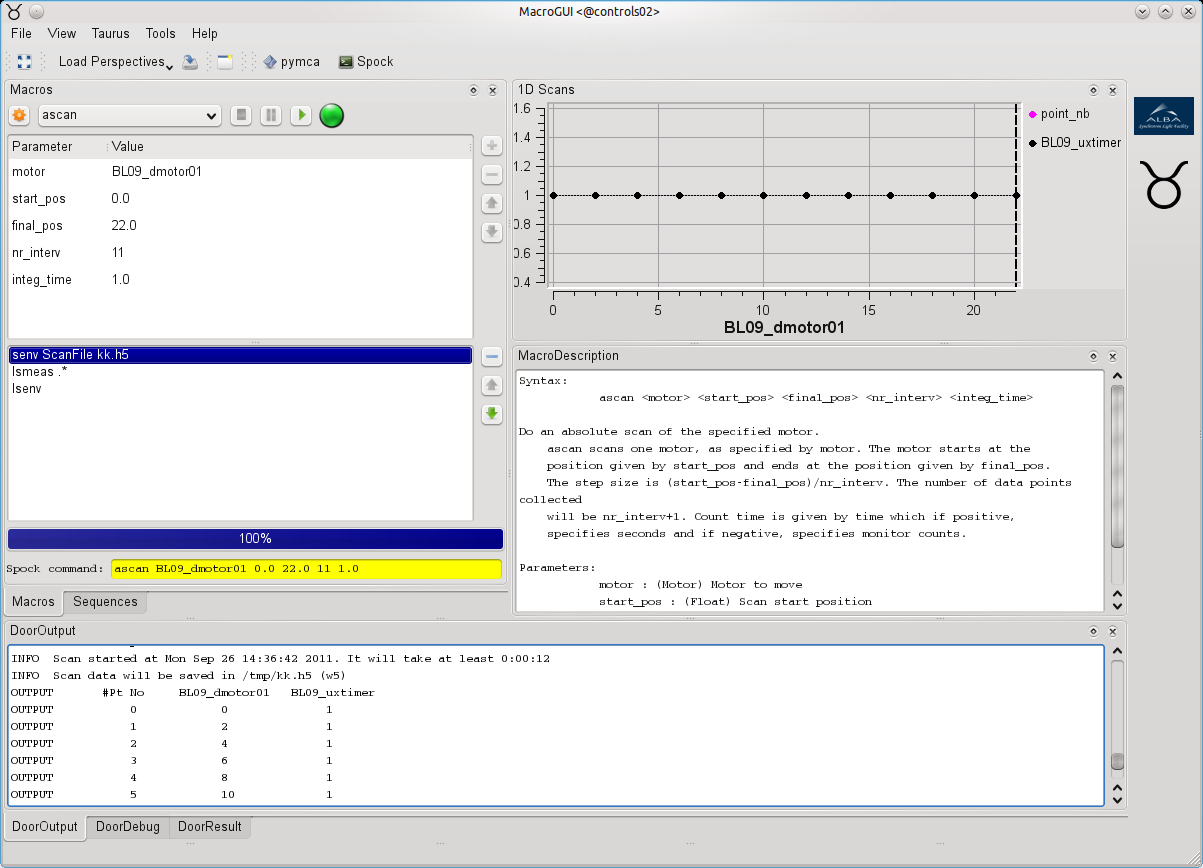
Macro-related panels (taken from the macrogui example that can be launched with taurus gui macrogui)
In most specific GUIs the macroserver and door name to use are pre-configured and the user does not need to change them. Sometimes though, you may want to alter it. You can do so by using the Taurus->Macro execution configuration… option.
Automatic creation of Instrument panels from Pool info
Some TaurusGui-based GUIs may also use information provided by the Pool Device Server about the Control System to automatically create TaurusForm panels containing all the controls related to the various instruments to be controlled by the GUI. An important characteristic is that, since these so-called instrument panels are created dynamically when launching the application, their number and/or contents may vary, reflecting changes in the pool configuration.
Examples of TaurusGui based applications
Taurus includes examples of TaurusGUI-based applications for demonstration purposes.
GUI name |
launch command |
Comment |
|---|---|---|
example01 |
taurus gui example01 |
Included in Taurus (<taurus>/qt/qtgui/taurusgui/conf/tgconf_example01) |
Macrogui |
taurus gui macrogui |
Included in Taurus (<taurus>/qt/qtgui/taurusgui/conf/tgconf_macrogui) |
Alba’s beam lines control GUIs |
ctblxx (xx is the beamline number) |
Internal ALBA development |
Known Issues
Cannot drop a panel (it stays floating)
This typically occurs because there is no enought room to acomodate the panel width or height in any of the available “slots”. Try to make room by hiding some other panel, or tabifying other panels together, or increasing the main window size.